Project 7MGTE, R151F, Dual Marlin Swap
Started 12/2/00Finished 02/15/01
Click here for updates - latest update - 12/03/04
Why the swap?
Why the swap?
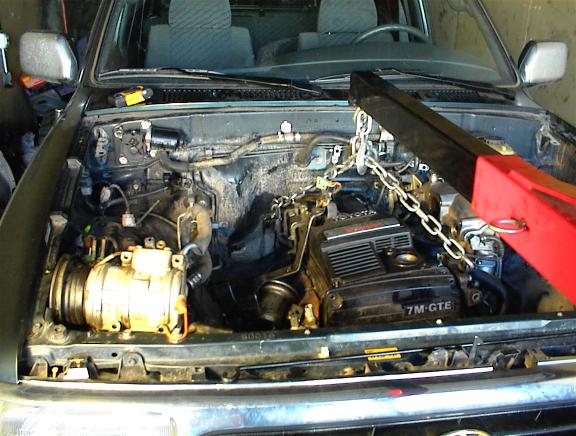
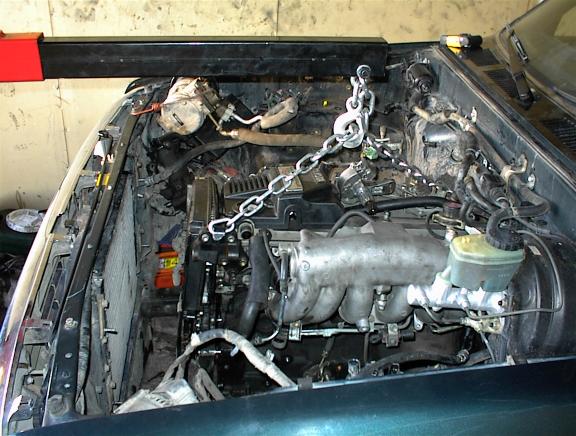 |
| Checking clearence on swap |
Transmission
The transmission I first chose was the 30-40LE family automatic transission,also known as the A340F, A340H, and A340E. The A340F is the most desired with the manual shifting transfercase. The transmission I had, the A340H, uses a hydraulic actuated transfercase which uses a chain driven transfercase that cannot be detached from the transmission(I don't completly agree with that). I wanted to use a gear driven transfercase so I could use Marlin Crawlers dual transfer setup. This changed shortly after I could not find an A340F, and that they would not be able to hold up to
kind of power I was going to be running. After that, I decided to go manual. There are generally 3 styles of manual 5 speed transmissions, W, G, and R. The R series, being the stongest, was my pick. There are then 3styles(in the US) of R series transmission. The R154, R150F, and R151F.
The R154 is a 2wd tranny from the 3rd generation turbo supra. The R150F is used in the V6 trucks, and the R151F is used in the turbo trucks.
Since the R154 is for 2wd applications, that leaves the R150F and R151F 4wd transmissions. The problem I would have with the R150F,
is that I would have to buy an adapter to be able to use the gear driven transfercase.
The R151F on the other hand, came stock with gear driven transfercase already attached.
So, I picked up an R151F. The R151F has 3 features that are very desirable for most toyota rock crawlers.
1. Tailhousing and outputshaft for the use of a gear driven transfercase.
2. Uses a stonger 23 spline, much stronger than the 21 spline.
3. Better 1st gear. 4.31 1st gear vs the 3.83 of the R150. The R151F is a much better tranny for rock crawling
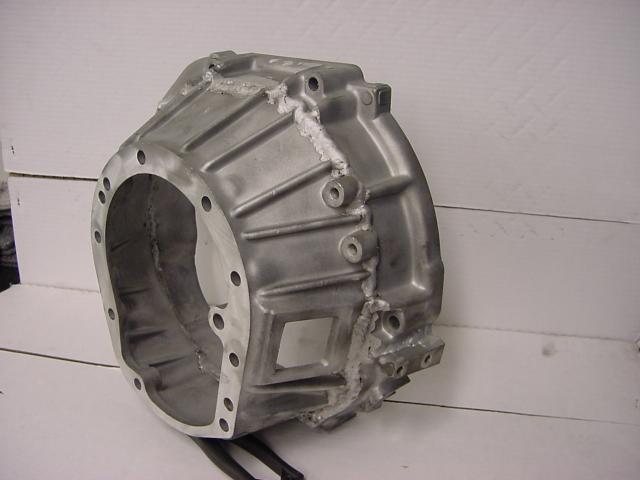 |
| Modified bell housing |
Clutch
The clutch peddle assembly was pretty easy. Being that my truck was an auto, I had to install a clutch pedal and master cylinder. All pretty easy.
I used a 2" hole saw, and drill for drilling the holes. To make this work, you also need to get the entire pedal assembly from a manual vehicle. Everything should bolt right up.
I used the assembly from a 1990 manual truck, fitting nicely with no extra mods. I ran
a piece of hard line under the brake booster, over the top of the motor, and down to the clutch where I used a piece of flex line to go from the hard line to the
slave cylinder. With my modifed bellhousing, I was still able to use the stock clutch fork and throughout bearing for the R151F(make sure you ALWAYS use the clutch fork from the bellhousing you are using, as they could be different lengths.)
I used the flywheel, pressure plate, and clutch used for a 1985 for the 5M. Flywheel and pressure plate has to be from a 1979 - 1992 N/A Supra.
If wanted, you could actually use the same clutch disk from the V6 trucks.
 |
| Engine Mount |
Mounting Hardware
The engine mounts used were from 7M. Unlike the 5M, and 22R mounts that had a flat surface with two flanges on the sides and holes for bolts, the 7M
use a single bolt. The frame mounts have slots for this bolt to slide into, and a nut is put on from the back side. I did have to design my own engine frame mounts, but that was pretty easy. I made them from 3/8 steel, so, strength is not an issue. The stock rear crossmember was not even close to lining up so scrap that. In looking for
Weld on two brackets on the side, and done. Too easy. With this crossmember, I was also able to raise my drivetrain a bit. I did have to cut out my horseshoe collar and move it up, but not to complicated. Another bonus to this crossmember, is where engine torque is applied. In stock configurations,
the stock transmission mounts really only helps with up, down, and side-to-side movement. It does not really help out with the twisting force of torque.
The FROR crossmember bolts to the rear of the t-case, spans out to the the frame rails. This setup will absorb nearly all the torque, and eliminate
motor mount breakage.
The mounts I made are for a v6 to 7M swap. If I had a 22R, the mounts are in different locations on the frame, and I would have the option of keeping
the stock mounts. If the stock mounts are kept, you can bolt the 7M to these mounts, but there are a couple things you must do. The 7M mounting brackets bolt to
the center of the engine. That may or may not be too far back for the stock frame mounts. If so, the mount brackets on the engine may be moved forward(5M engine
mount brackets from 85-older supra may be required to move forward).
If that is done, the oil filter plate, must be rotated to make room for the bracket. Use the rubber mounts from the old 22R and bolt those to the engine brackets.
Engine should go right in as long as there aren't clearance issues with firewall, egr valve, and brake booster.
Cooling
Wanting to have A/C, I decided to cut out my front radiator support, yes that includes the hood latch. I just now use hood pins to hold down the hood.
I am using the Supra radiator for cooling now, and it works great. I welded bushings on the front crossbar for the radiator pegs to go into, and made mounting straps for the top.
I then mounted two 1200 CFM fans to pull through need. So far I stay below 200 degrees, even on hot days at full throttle and boost.
Exhaust
A custom 3" exhaust was made with a high flow cat, and flowmaster 3 chamber muffler(I wanted it to be quite unlike my cars running a single chamber). There was a little problem with the exhaust system, but, there is a way around everything. The exhaust on the 7M drops down from the passanger side. Well, this is where the
the driveline is. I could not run the 3" pipe straight back. And, I could not cross over under the transmission, for sure it would get smashed. But, there was
a nice little gap between the oil pan and the transmission, and the exhaust seems to route nicely though there, then all the way back.
A little later, I changed my exhaust routing. I was able to run the exhaust down and directly back. I did have to relocate the gas tank, but with that, I get more direct flow and lets bends.
Fuel
The 7MGTE requires about 30-40 psi in the fuel rail in order to deliver enough fuel. By looking at the size of the V6 fuel pump, and the 7MGTE fuel pump, I don't think it will do the job. I removed the pump from an 87 Supra Turbo, and fit it to the V6 fuel tank. Not a perfect fit, but it works great. The 7MGTE pump is a much lager one. This will make sure I get the proper fuel flow and pressure. The turbo's are very picky about that. The stock fuel lines run along the passanger side of the truck on the inside of the frame rail. This is good except that the fuel would have to pass directly next to the turbo. Not wanting this, I had to
run the lines over to the drivers side. This is the side the exhaust comes down, but by then the exhaust is much cooler and shouldn't be a problem.
Power Steering
I am using the pump and reservoir that comes with the supra. I was acutally able to use the stock lines that connected to the ABS box on the right frame rail.
No special adapter or hoses, connected with only an adjustment with a tube bender.
Drivelines
Front and rear drivelines have CV. Rear drivline had to be shortened. Front driveline is custom long travel.
A/C
Well, unfortunalty, I had to remove the A/C, but only temporary. I will get the A/C working. I have plans to put the condensor back close to the original location.
May need to be moved forwad slightly, but shouldn't interfere with much.
Intercooler
After 3 intercoolers, I finally have one that works. It is a little big, but heh, it is almost too efficient.
It is out of a 2001 Ford PowerStroke, and the thing is massive. Because the pipmes coming off the IC were 3", I decided to go 3" piping for the entire intake. I will probably to some testing with some smaller pipes, but for now, the 3" works awesome. I always here about how laggy the CT-26 turbo is when upgraded with the 60-1 compressor. Full spool usually doesn't come until almost 4,000 RPM. With my old piping and IC's, that is exactly right. I got a nice boost of power at 4,000 RPM, but nothing before.
Now, full boost at 2,500, and hardly any lag. It is amazing. I can now break traction when I hit full boost and around 4,000 RPM running 35" tires. Quite a rush I tell you.
Pictures
Wiring
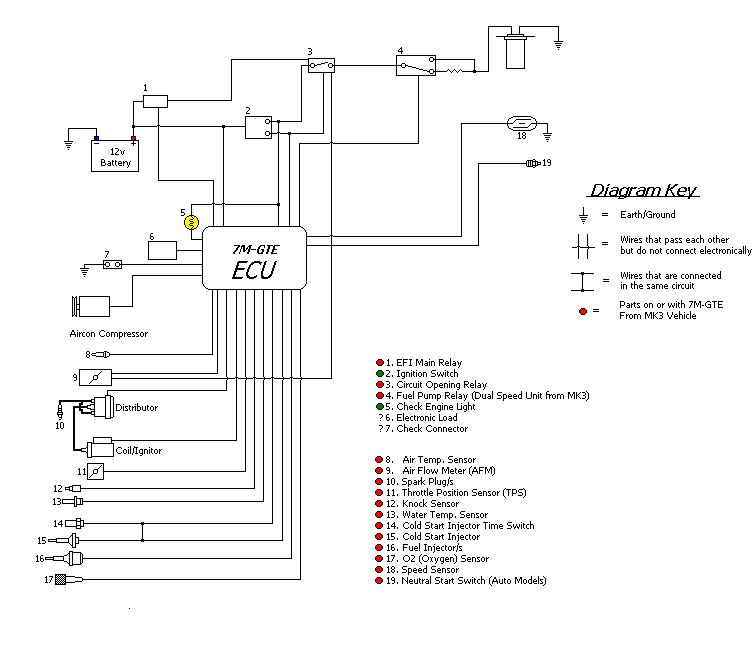 |
| Diagram of 7MGTE ecu and harness |
Installation
Click installation for next page.
email me at robertj@linux4free.com for any comments or questions
Finally finished. Took me long enought, but I got it done. So far I have about 500 miles on it, and no problems. Damn this thing no has a lot of power. I will post pics later.